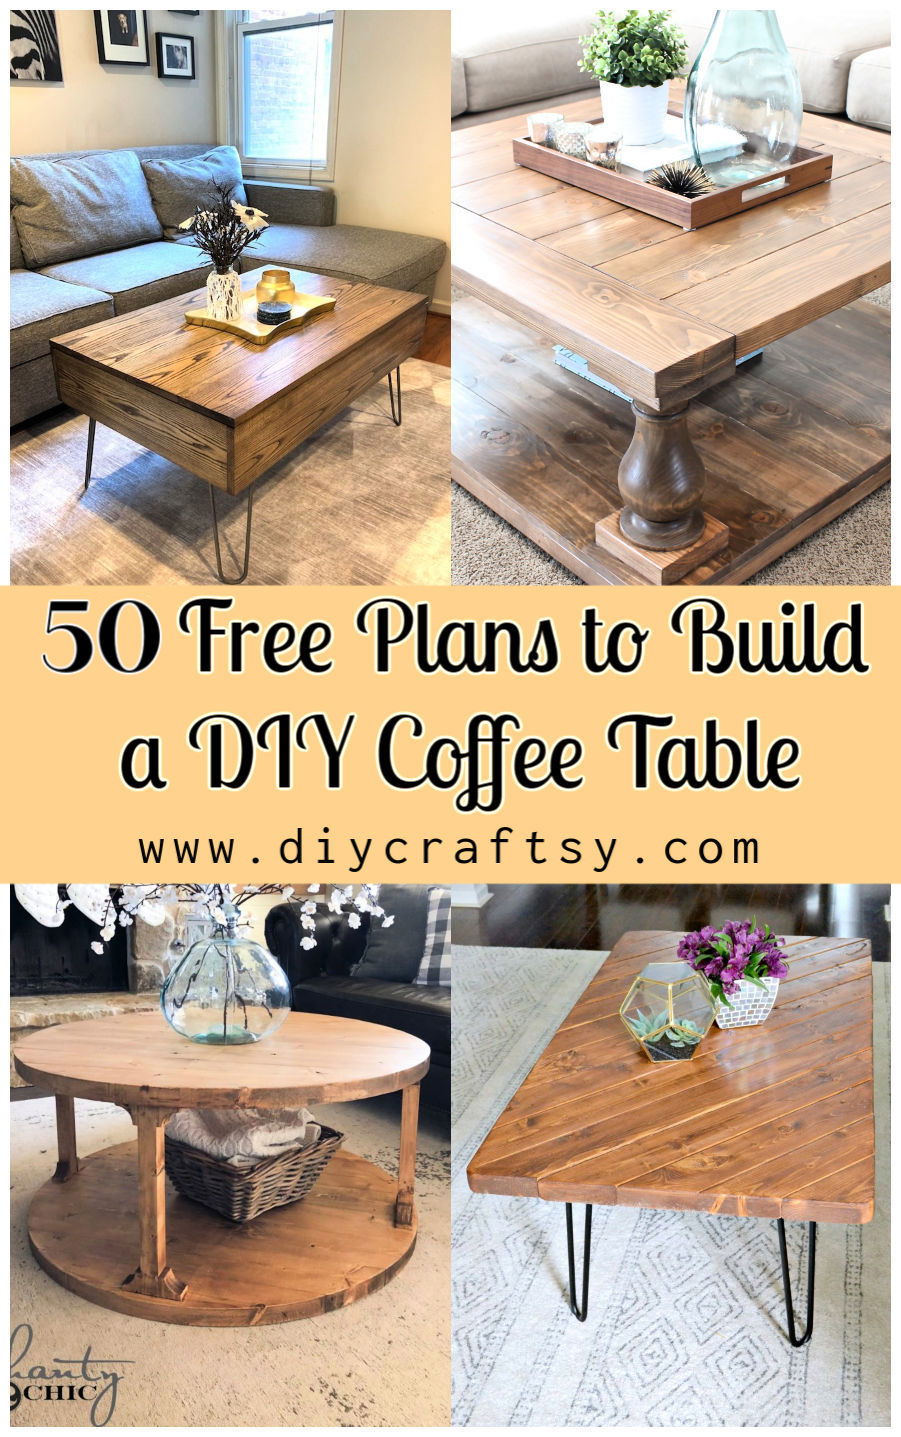
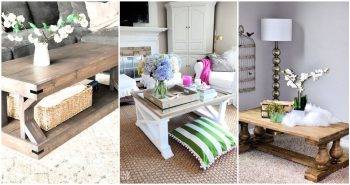
Finding the perfect coffee table can be a tough task. You want something that’s functional and stylish, but you don’t want to spend a fortune. Fortunately, We’ve compiled a list of 50 free diy coffee table plans that are simple to build yet still offer all the functionality and good looks of their more expensive counterparts. And best of all, they won’t break the bank!
So whether you’re a beginner woodworker or an experienced DIYer, these free coffee table plans are sure to come in handy. To get started, simply choose a plan that fits your skill level and budget, and then get to work!
If you love to DIY, there’s no reason you can’t build your own coffee table. In fact, with the right plans and some basic woodworking skills, you can create a beautiful coffee table that will become the centerpiece of your living room.
Are you looking for something a little more unique? Check out our list of 50 inexpensive diy pallet coffee tables for some inspiring ideas. so it shouldn’t be too difficult to find one that’s perfect for your needs. And if you want, you can even customize it to match the decor of your home.
1. Modern DIY Coffee Table Using Wood
Ready to add a touch of modern flair to your living space with a homemade touch? Hana’s Happy Home brings you an easy-to-follow DIY Modern Coffee Table guide that’s perfect for both indoor and outdoor settings. With simple tools, materials, and step-by-step instructions, crafting your own stylish centerpiece has never been more accessible.
Learn how to select lumber, cut wood, assemble and paint the pieces, and apply a weatherproof sealant for a durable and chic coffee table. Dive into the project and transform your relaxation area with a custom piece that you can proudly say you made yourself.
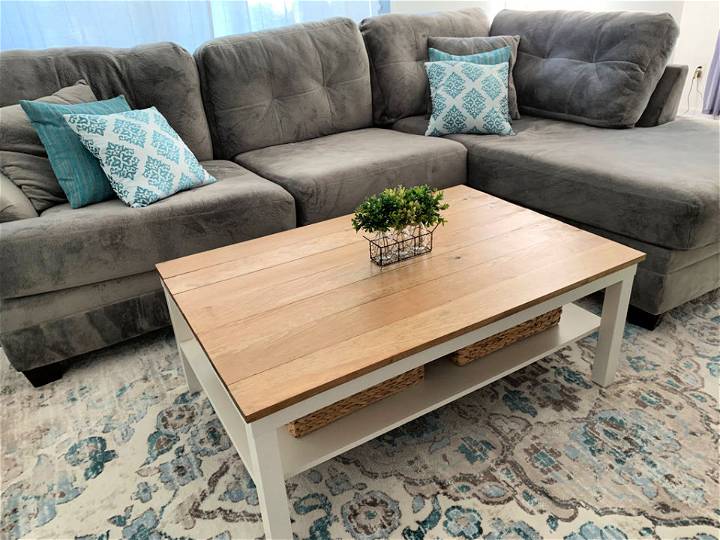
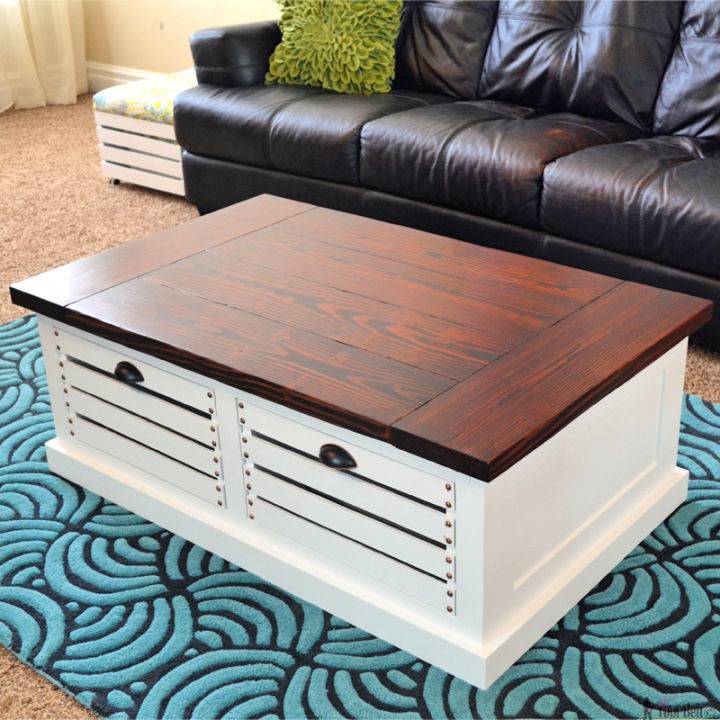
2. Make a Lift Top Coffee Table for Living Room
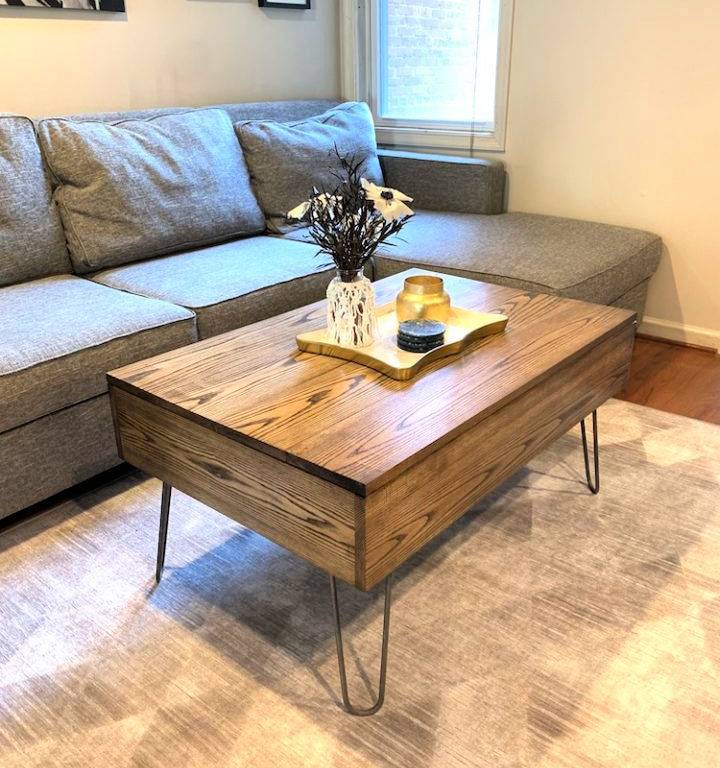
Transform your living room with a custom-made lift top coffee table that blends functionality and style. Chisel & Fork provides a detailed guide to creating a DIY lift top coffee table, perfect for those who love to add a personal touch to their home decor. With step-by-step instructions, a comprehensive shopping list, and a clear cut list, this project is accessible to crafters who enjoy woodworking. The use of hardwood like ash ensures durability, while the option to stain or paint allows for complete customization to match your space.
The guide also includes a variety of tools and techniques, ensuring a polished result that will become the centerpiece of your living room. Dive into this DIY project and create a piece that is both practical and chic, elevating your space with a unique coffee table that rises to the occasion.
3. Waterfall Framed 60” Rectangle Coffee Table
For woodworking enthusiasts ready to tackle a challenging project, Ana-White.com offers free plans for crafting a stunning Waterfall Framed 60” Rectangle Coffee Table. This advanced-level project involves creating a minimalist, modern design with mitered corners and a spacious lower shelf for additional storage.
With a cost estimate of about $150 for lumber, this project demands precision and a good set of tools. The finished coffee table is not only a functional piece of furniture but also a statement of craftsmanship and style. By following the step-by-step instructions, you can create a beautiful and durable coffee table that’s sure to be the centerpiece of any living space.
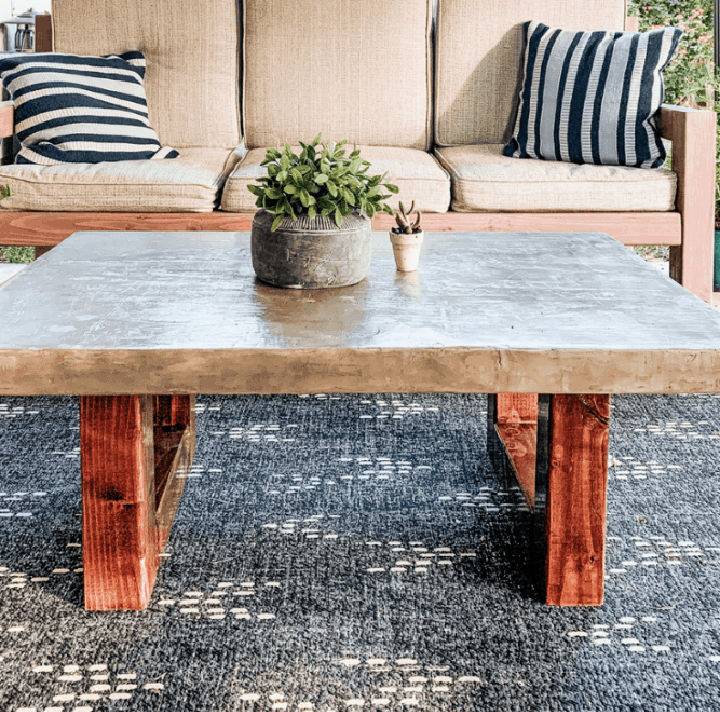
4. Homemade Angled X Base Coffee Table
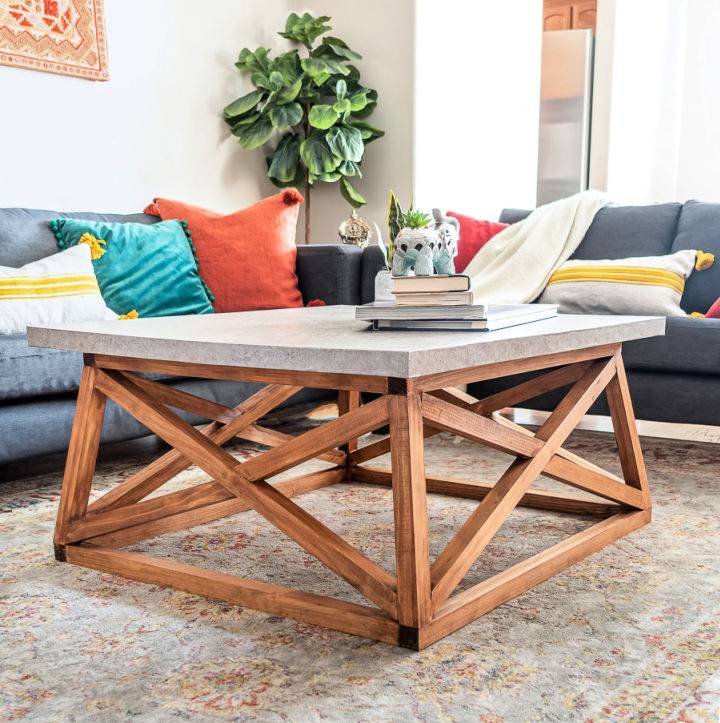
Ready to enhance your living space with a touch of modern elegance? The House of Wood offers a comprehensive guide on crafting a DIY Concrete and Wood Angled X Base Coffee Table. With free plans and a step-by-step tutorial, you can create a stunning centerpiece that mimics the look of concrete without the weight. Gather your materials, including 2×2 boards, plywood, screws, and tools like a miter saw and drill.
Follow the clear instructions to assemble the frames, add the angled pieces, and secure the faux concrete top. Finish with your choice of stain or paint for a custom look that suits your decor. This project is perfect for those who enjoy hands-on activities and wish to add a personal touch to their home furnishings. Jen Wood House
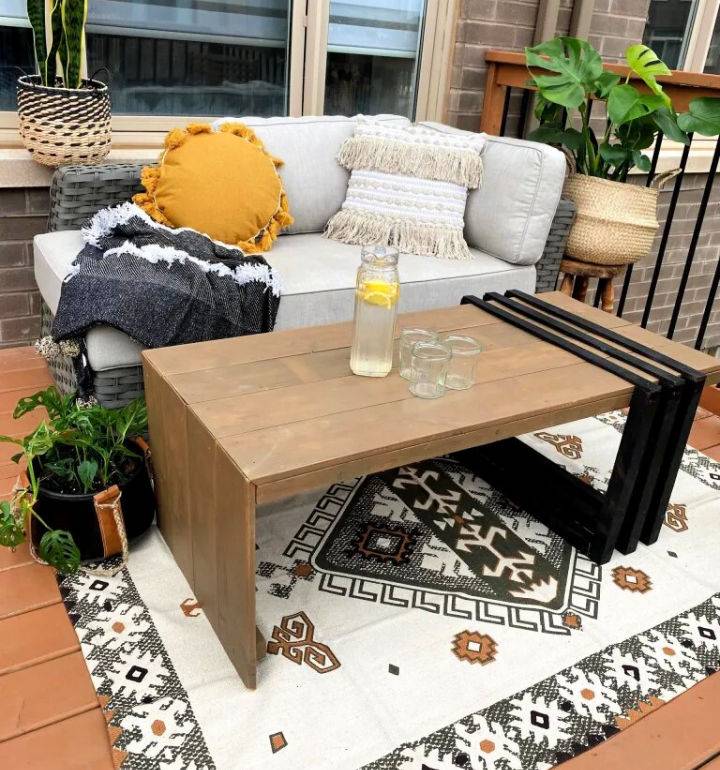
5. Free Chunky Outdoor Coffee Table Plan
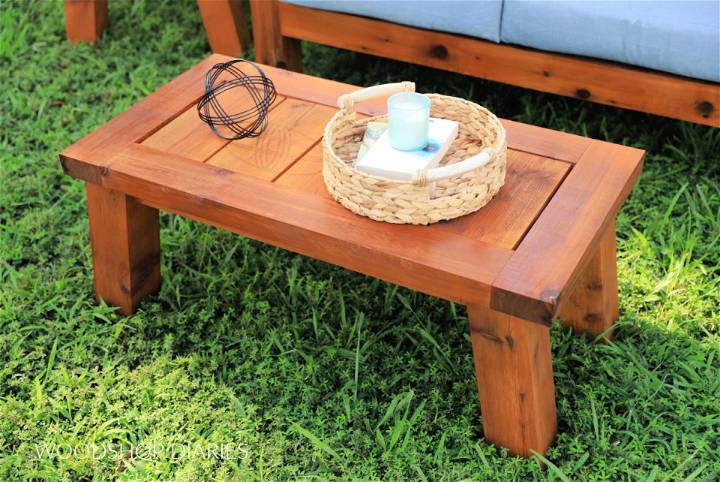
Ready to enhance your outdoor living space with a DIY touch? Woodshop Diaries offers a step-by-step guide to building a chunky outdoor coffee table that’s both stylish and functional. With basic tools, minimal materials, and a weekend’s worth of effort, you can create a rustic yet modern centerpiece for your patio or deck. Opt for weather-resistant wood like cedar, and finish with an exterior sealant to ensure your handcrafted table withstands the elements. Dive into the project with confidence, knowing you can customize the size to suit your space, and enjoy the satisfaction of a job well done.
6. DIY Coffee Table From Vintage Chicken Coop
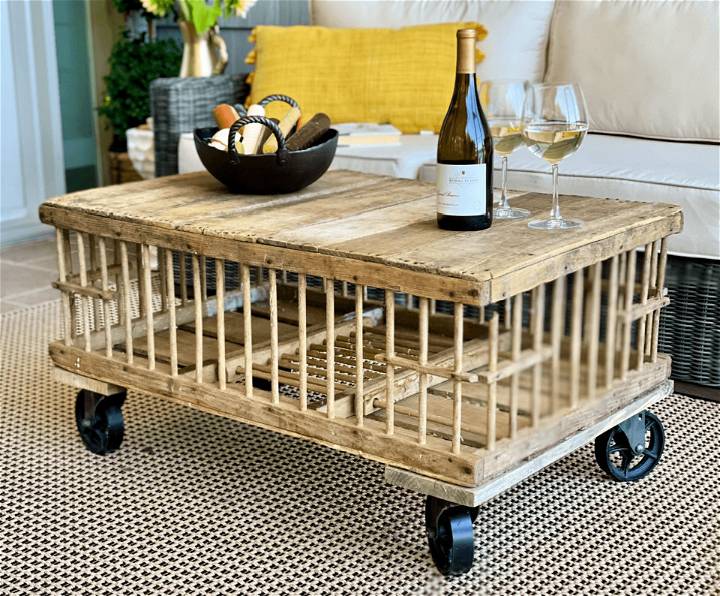
Transform a vintage chicken coop into a charming, functional coffee table with this easy DIY guide from A Life Unfolding. Discover how simple it is to upcycle this unique find with just a few supplies and steps. Learn to clean, sand, and seal the coop for a fresh new look, and how to select the perfect casters to add a touch of vintage flair.
Tailor the size of your new coffee table to fit your space, and infuse your home with a piece that tells a story. Ideal for adding character to any room, this project is both cost-effective and rewarding, creating a conversation starter that’s as practical as it is stylish.
7. How to Make a Custom Burl Coffee Table
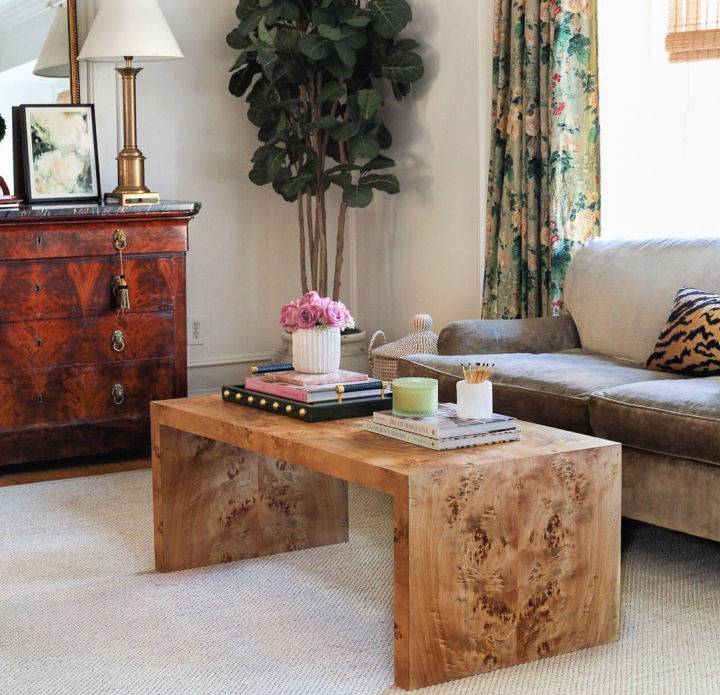
Transform your living space with a custom-made burl coffee table, a statement piece that reflects both style and craftsmanship. A Glass of Bovino shares an in-depth DIY guide to help you create a bespoke centerpiece for your home. From selecting the right materials like burl veneer and MDF, to cutting, gluing, and finishing, every step is detailed to ensure your project is successful.
Get ready to roll up your sleeves and craft a unique burl wood coffee table that’s sure to impress your guests and add a touch of elegance to your decor. With practical tips and a clear approach, you’ll have the confidence to take on this rewarding woodworking project.
8. Easy DIY Pallet Coffee Table

Looking to add a rustic touch to your living space? Design to Build offers a step-by-step guide on crafting a charming pallet coffee table that’s both budget-friendly and simple to create. With detailed instructions on disassembling pallets, cutting, sanding, and assembling, this DIY project is perfect for adding a unique and personal piece to your home. The tutorial also includes tips for painting and finishing, ensuring your coffee table fits seamlessly with your decor. Perfect for gifting or personal use, learn how to build a farmhouse-style coffee table that’s sure to impress.
9. Building a Wood Coffee Table
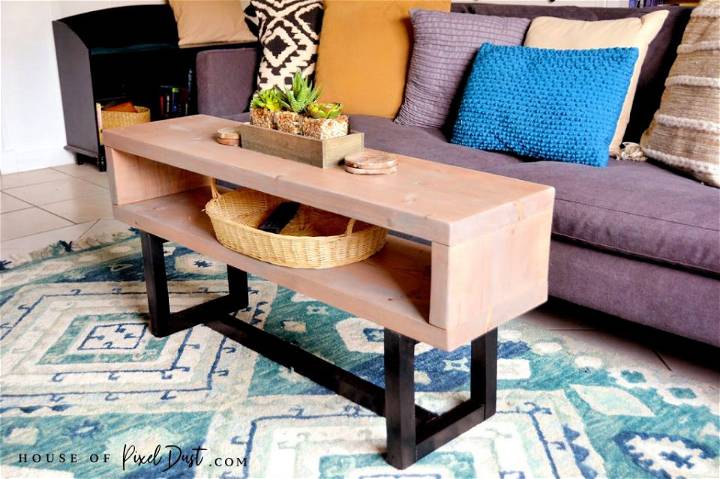
Create your own modern wood coffee table with a double top storage feature by following this easy, step-by-step guide from House of Pixel Dust. Ideal for those on a budget, this DIY project lets you craft a stylish and functional piece of furniture for under $20. With a design that includes comfortable leg space and an additional shelf for storage, this coffee table is not only aesthetically pleasing but also practical. It can even serve as a bench for extra seating.
The tutorial offers clear instructions on measurements, cuts, and assembly, ensuring a smooth crafting experience. Sanding, painting, and staining tips are included to help you achieve a professional finish. Get ready to enhance your living space with this custom, handmade addition.
10. DIY Aged Coffee Table – Step by Step Instructions
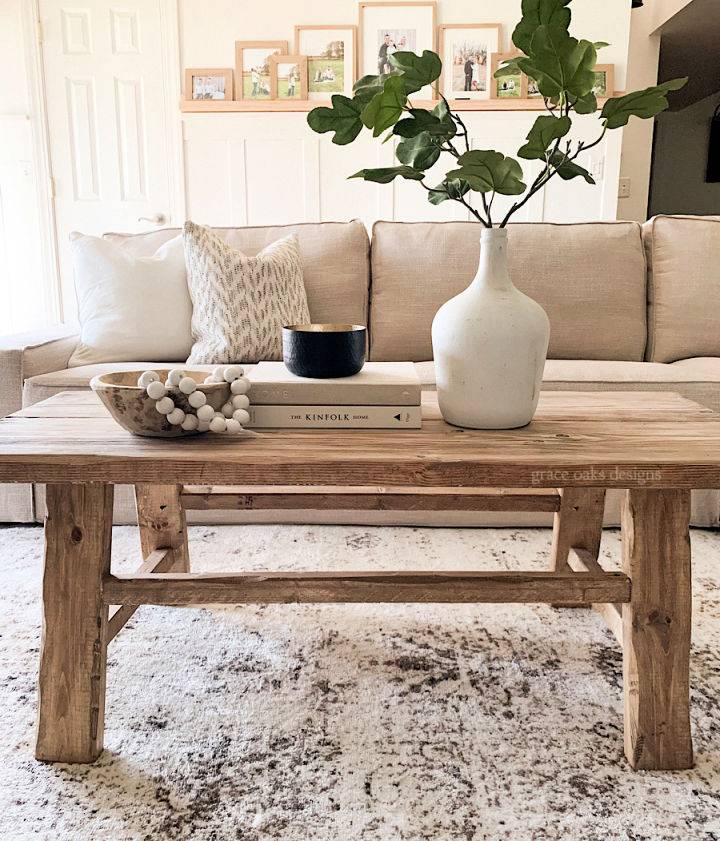
Transform your living space with a DIY Aged Coffee Table that exudes rustic charm and character, reminiscent of antique Chinese stools. Grace Oaks Designs offers a step-by-step tutorial to help you create a unique piece of furniture that becomes a focal point in any room.
With a list of materials and detailed instructions, you’ll learn how to cut, assemble, and distress pine wood to achieve an authentically aged look. Whether for personal use or as a gift, this project promises a rewarding crafting experience and a beautiful, functional addition to your home decor.
11. Making a Patio Coffee Table With Pavers
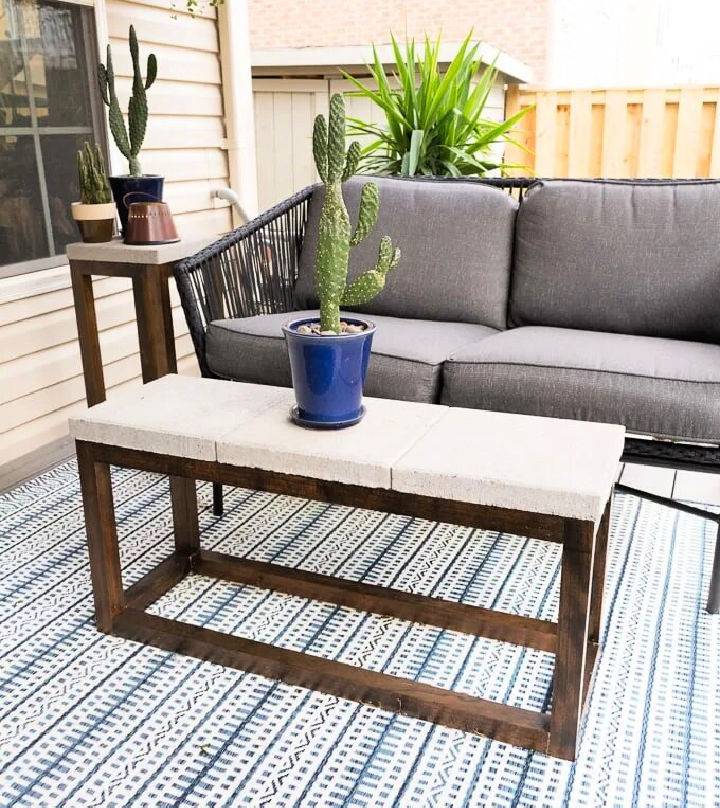
Looking to add a unique touch to your outdoor space with a DIY patio coffee table? By Brittany Goldwyn offers an innovative solution using 2×2 lumber and concrete pavers—no concrete pouring required. Her step-by-step guide is perfect for those who want to create a sturdy, stylish coffee table without the hassle of complex construction.
The tutorial includes a full cut list, assembly instructions, and tips for staining and finishing. It’s an engaging project that will enhance your patio’s ambiance and provide a functional centerpiece for outdoor relaxation. With Brittany’s helpful instructions, you can achieve a professional-looking coffee table that’s both practical and eye-catching.
12. Make Your Own Coffee Table
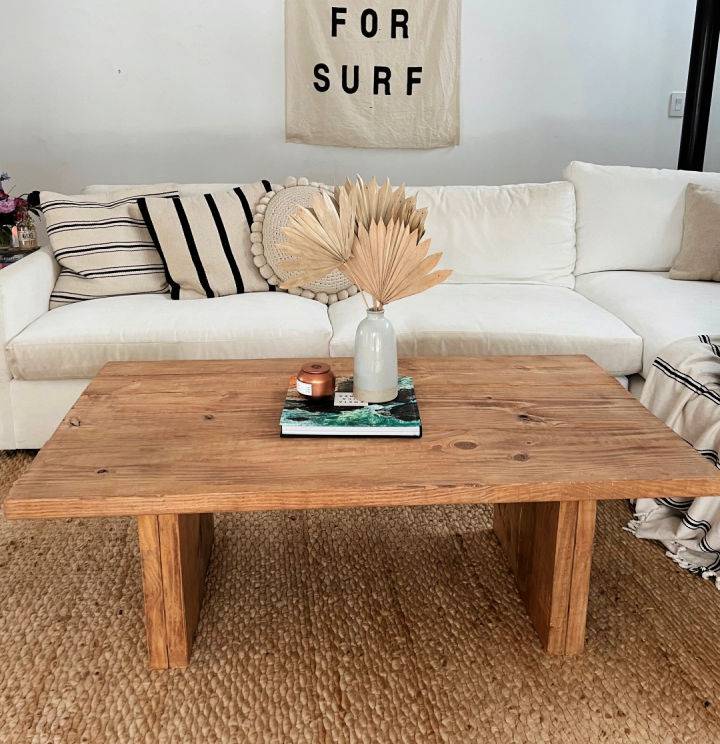
Ready to add a rustic beachy charm to your living space with a DIY coffee table? KC Double Take offers a step-by-step guide inspired by a TikTok video by Mandy Paulino. With a detailed list of materials and tools, you can create a custom piece that fits perfectly in your home. From cutting the wood to applying the final coat of polyurethane, this tutorial ensures a smooth process. Dive into this project with confidence, as the instructions are clear, helpful, and perfect for anyone eager to craft their own stylish coffee table.
13. 15 Minute Hairpin Leg Coffee Table
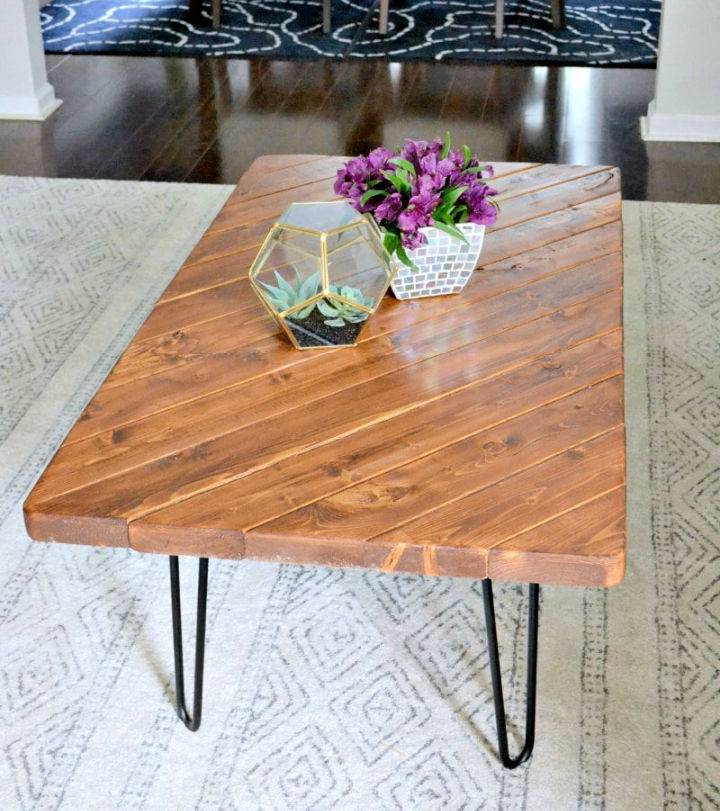
Looking to craft a stylish coffee table without the hefty price tag? Ugly Duckling House offers a step-by-step guide on creating a DIY Hairpin Leg Coffee Table that’s both chic and simple. Sarah walks you through the process using scrap lumber and hairpin legs, ensuring you can transform your living space in an afternoon.
With detailed instructions on cutting, assembly, and finishing, this project is ideal for anyone eager to add a personal touch to their home decor. Perfect for a quick living room update, this DIY coffee table adds function and flair to your space.
14. Outdoor Coffee Table With Beverage Cooler
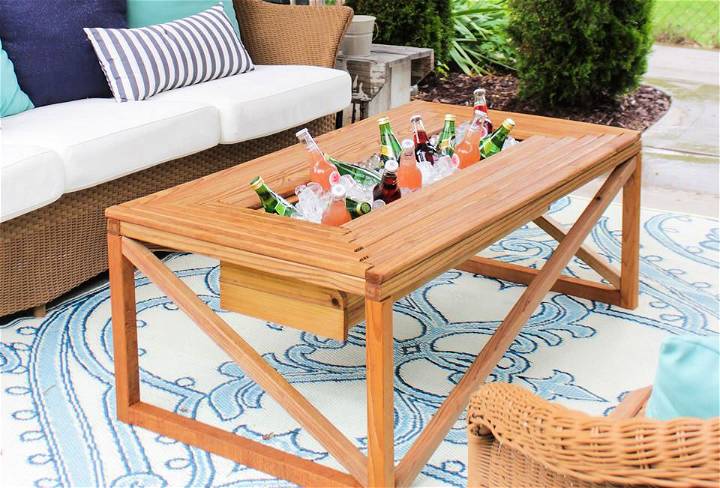
Elevate your outdoor living space with the Kreg Tool‘s cedar-tone coffee table, featuring a versatile drop-down insert that seamlessly transitions from a refreshing beverage cooler to a charming plant holder. This DIY project is perfect for those who love to entertain or simply enjoy the serenity of their patio or deck. The flush-fitting lid offers additional surface area when needed.
Constructed for durability and designed for convenience, this coffee table is a stylish and functional centerpiece for any outdoor gathering. Follow the step-by-step instructions to create your own, ensuring each piece is securely attached and properly sealed for long-lasting enjoyment. With its natural wood finish and clever design, it’s sure to be a conversation starter at your next outdoor event.
15. Building Your Own Coffee Table
Transform your living space with a dual-purpose coffee/dining table, a clever and functional piece of furniture perfect for those who love to maximize their home’s potential. Mike Berner’s guide on Family Handyman offers an intermediate-level DIY project that combines the charm of a coffee table with the practicality of a dining table. With a detailed step-by-step process, this guide helps you create a sturdy, stylish table that flips from casual to formal in a snap.
The instructions are clear, engaging, and designed to assist you through the crafting journey, ensuring that the end result is both aesthetically pleasing and highly useful. Whether hosting a large family gathering or needing an extra work surface, this innovative table design is a smart addition to any home.
16. DIY Farmhouse Coffee Table at Home
Looking to infuse your home with rustic charm? Sara Douglas at SavvyMomLife.com guides you through crafting a DIY Farmhouse Coffee Table that’s not only budget-friendly but also durable. With clear instructions and a modest materials list, you’ll be well on your way to adding a touch of southern elegance to your living space. Sara’s step-by-step approach simplifies the process, ensuring an enjoyable building experience that yields a beautiful and functional coffee table.
Perfect for busy families, this project can be completed over a few weekends, allowing you to create a centerpiece for your home that’s both stylish and satisfying to make. Get ready to roll up your sleeves and transform your living room with this accessible DIY venture.
17. How to Make Your Own Coffee Table
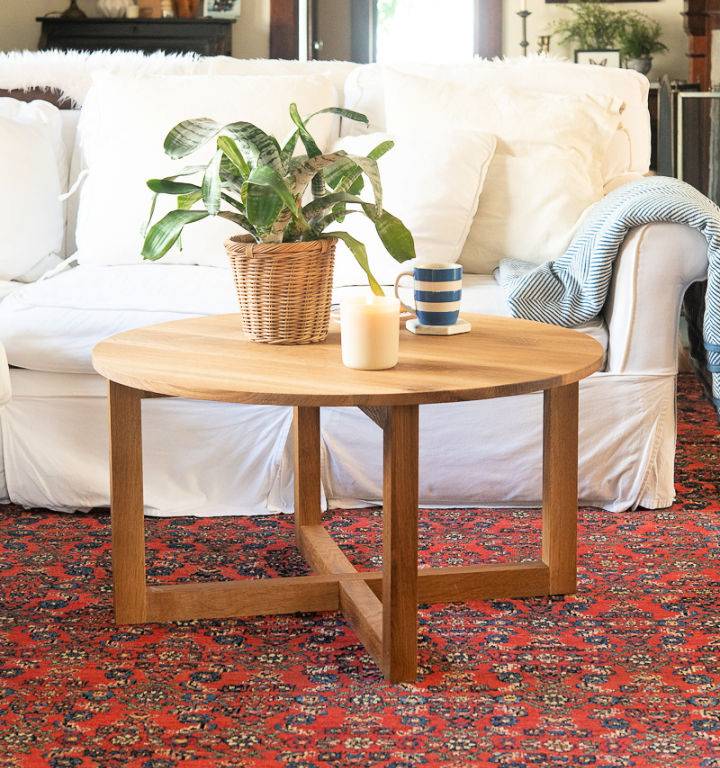
Discover how to create a stunning DIY coffee table with a Scandinavian touch, perfect for complementing sectional sofas. Finding Silver Pennies provides a detailed guide on crafting a timeless piece using beautiful white oak wood. The design features a simple yet modern base with interlocking halving joints, highlighting the natural beauty of the wood grain. Ideal for those who appreciate solid wood construction and the ability to customize furniture to their space, this DIY project promises a blend of aesthetic appeal and practicality.
Follow the step-by-step instructions to cut, assemble, and finish your table, including tips on using WOCA Oil for a durable and environmentally friendly seal. Elevate your living room with this handmade creation that’s not just a piece of furniture, but a conversation starter and a gathering spot for family and friends.
18. DIY Wood and Resin Coffee Table
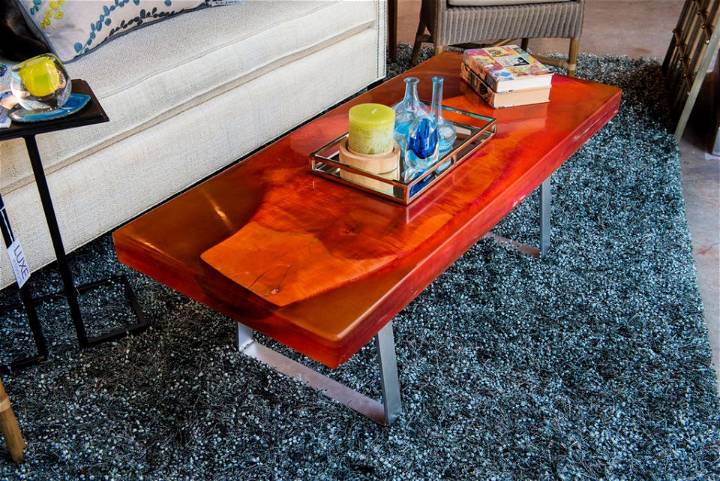
Craft a stunning wood and resin coffee table with guidance from Instructables. This step-by-step tutorial walks you through selecting a live-edge wood slab, prepping it, and combining it with vibrant resin to create a unique piece of furniture. Learn to build a mold, pour and cure the resin, sand and polish the surface, and attach custom metal legs.
This project, perfect for DIY enthusiasts, blends art with craftsmanship, resulting in a coffee table that’s not only functional but also a conversation starter. Whether adding a personal touch to your home or gifting a handmade masterpiece, this guide helps you achieve a beautiful finish.
19. Handmade Gold and Wood Coffee Table
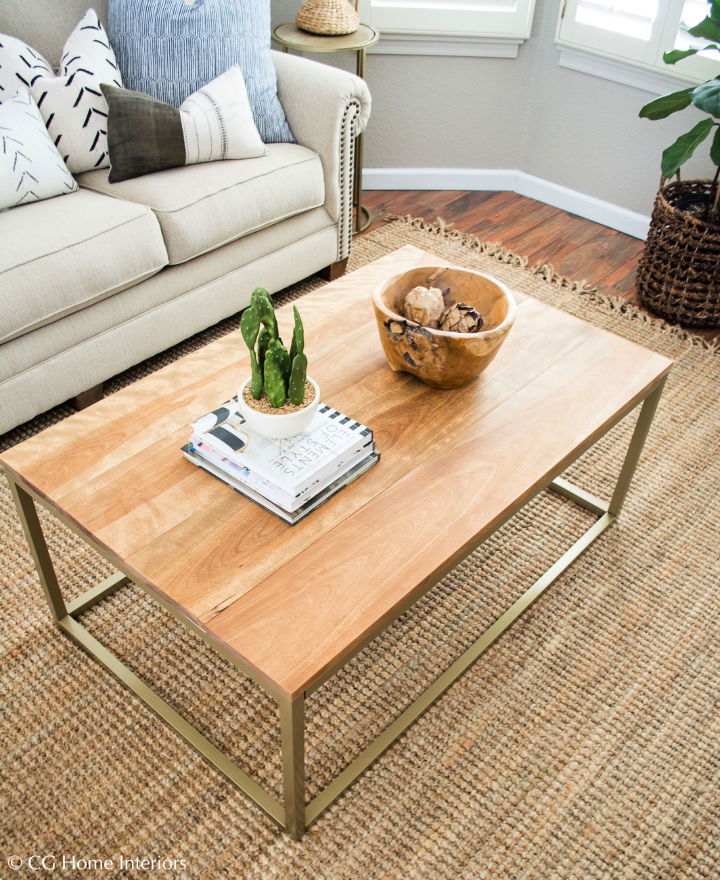
Discover how to create a stunning gold and wood coffee table with this DIY guide from CG Home Interiors. Christina shares her clever upcycling idea that transforms a damaged coffee table into a chic, budget-friendly piece for your living space. With a detailed supply list and step-by-step instructions, you’ll learn how to paint the base a luxurious gold and craft a beautiful wooden top. This project is perfect for adding a personal touch to your decor while being both cost-effective and enjoyable. Get inspired to revamp your old furniture with this engaging and helpful tutorial.
20. Simple DIY Round Coffee Table
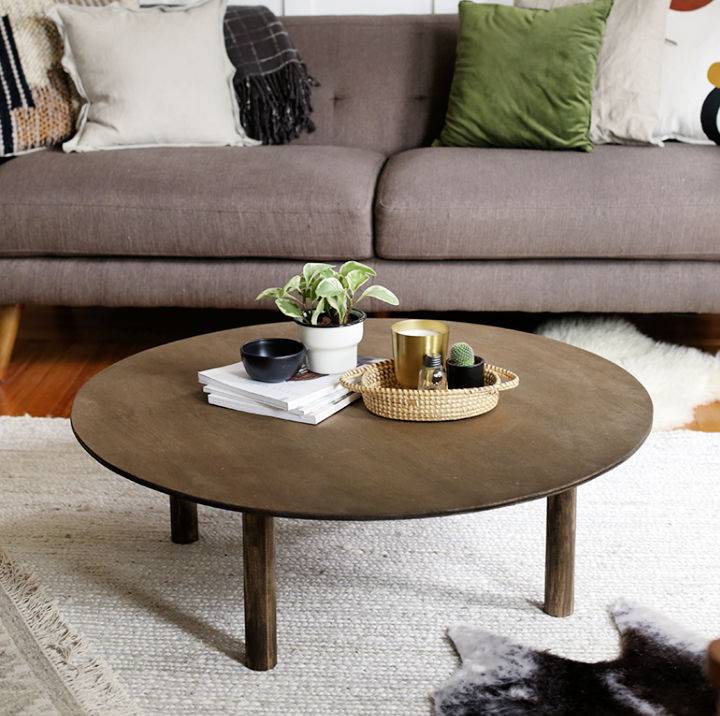
Creating a round coffee table can add a touch of style and functionality to your living space. The Merrythought offers a DIY guide that is perfect for those who enjoy woodworking projects. You’ll need simple materials like plywood, round dowels, and basic tools such as a jigsaw and drill. The process involves cutting a circular tabletop, preparing the leg supports, and assembling the pieces.
The instructions are clear, with steps on how to measure, cut, and sand the wood before staining it to match your decor. This project is suitable for crafters who want to create a custom piece of furniture that’s both practical and visually appealing. With this engaging and easy-to-follow tutorial, you can build a coffee table that’s sure to be a conversation starter.
21. Concrete Outdoor Coffee Table Design
Discover how to create a stunning DIY concrete outdoor coffee table with Love & Renovations‘ easy-to-follow guide. Amanda Hendrix details the process, from building robust legs to applying a feather finish for a chic concrete look—without the heavyweight. This project is perfect for those who enjoy crafting functional outdoor furniture.
With a comprehensive list of tools and materials, step-by-step instructions, and helpful tips for sealing and finishing, you’ll be equipped to construct a durable, stylish coffee table that complements any backyard space. Engage in this creative endeavor and add a personal touch to your outdoor living area.
22. Inexpensive DIY Farmhouse Coffee Table
Transform your living space with a touch of DIY flair using the Ever Blooming Originals guide to creating a farmhouse-style coffee table from an IKEA Lack table. This step-by-step tutorial is perfect for anyone wanting to add a personalized and rustic element to their home without overspending. With a list of simple materials and clear instructions, you can upgrade your living room with a customized coffee table that boasts a professional finish. Learn how to select and stain wood, assemble your table, and apply the perfect finish for a durable and stylish centerpiece. Get ready to impress your guests and enjoy your handiwork with this engaging and practical project.
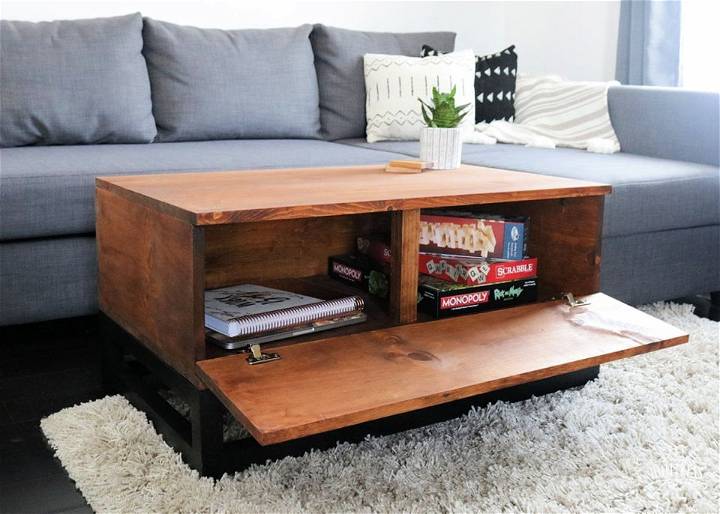
23. Board Gamer Coffee Table Building Plan
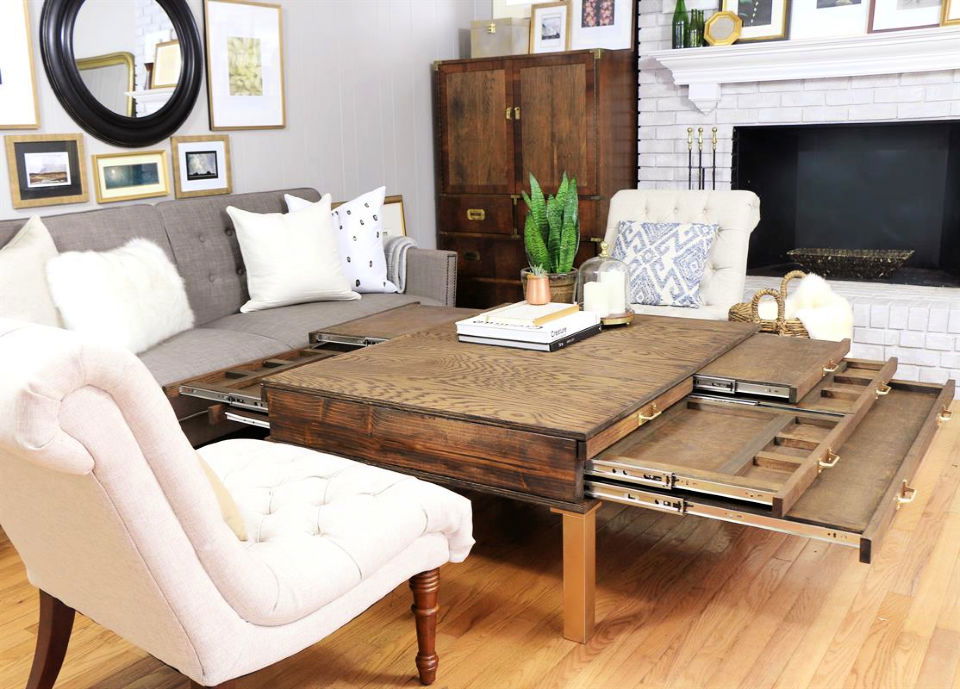
Transform your living room into the ultimate gaming hub with the Board Gamers Coffee Table, a must-have piece of furniture for tabletop game enthusiasts. Featured on the Home Made by Carmona blog, this coffee table combines elegance with functionality, offering a stylish surface that houses cleverly designed pullouts and compartments. It’s perfect for game nights, doubling as convenient TV trays for hosting, and providing ample storage space. The additional compartments are great for organizing puzzles or other entertainment essentials.
Building this coffee table is straightforward, with clear instructions guiding you through drilling pocket holes, attaching sides, and creating pullout drawers. The oak finish adds a touch of sophistication, while the hardware ensures durability. With this coffee table, you can keep your space tidy and your games ready to play at a moment’s notice. Follow the steps from Kreg Tool to craft this centerpiece that’s both a conversation starter and a functional addition to your home.
You may love these free coffee table ideas for your home
Not only for utility purposes, but the cheap coffee tables play a vital role in boosting the home decor and storage space of a living room. People can use the coffee tables with storage or built-in secret stashes! Or DIY lift top coffee table if they need some extra storage space in their living room. By adding a glass top or a flower vase to the top of a DIY coffee table, one can also turn it into a living room centerpiece. Want some great DIY coffee table ideas and plans for free? If Yes, then we have some perfect rectangle coffee table designs!
Do you want the best coffee table plans for free?
In short, missing a coffee table in the living room would not be appreciated in any way as it is the very first demand and need for a living room. So you can make your favorite coffee table easily with this perfect list of 150 DIY coffee table ideas & plans that can be made at home. All these DIY coffee table plans are free, style-worthy, sturdy, and cheap.
Want to reuse and recycle the old wooden pallets? then try the best furniture made from pallets for your home and garden!
Don’t worry about the supply materials; all you need is to target the common material of home to build any of these DIY coffee tables. The most used material would be the old wood like a wooden slab, Pallets, plywood, etc. Always easy-to-find in the home or surroundings.
Find More DIY projects You’ll Love:
Tops are the most amazing part of the coffee table. According to these DIY furniture projects, one can prefer the concrete tiles, glass slabs, and plain wood sheets for amazingly smoother and elegant tops. DIY coffee table plans with built-in shelves would be all amazing to get a coffee table with storage.
Prefer wheels or simply reclaim the metal from home and build metal hairpin legs for your handmade wooden coffee tables. One can also use box-style copper legs for more stability, as shown in these DIY coffee table ideas.
You can also get help from these easy DIY projects for your home improvement.
24. DIY Coffee Table Using Pallet Wood
Discover how to create a stunning coffee table inspired by West Elm without the hefty price tag. DIY Candy‘s guide offers a practical, step-by-step approach to crafting a chic centerpiece for your living space, all for under $50. Using reclaimed pallet wood, this project is perfect for those with some experience in woodworking looking to enhance their skills and add a personalized touch to their home decor. Follow the detailed instructions, complete with a downloadable cut list, and get ready to transform raw materials into a stylish and functional piece of furniture.
25. Make a Crate Coffee Table With Storage
Transform your living space with a practical and stylish Crate Storage Coffee Table and Stools, expertly crafted by Her Tool Belt. Ideal for homes seeking both organization and charm, this DIY project offers ample storage without compromising on design. The coffee table features roomy crates, perfect for stowing away toys, blankets, or magazines, while the mobile stools double as additional seating and storage with cushioned, flip-up seats. The step-by-step guide is detailed and easy to follow, ensuring a rewarding building experience. Elevate your family room with this multifunctional furniture set that promises to keep clutter at bay and enhance your decor.
26. DIY Coffee Table With Hidden Storage
Create a stylish and functional centerpiece for your living space with DIY Huntress‘s DIY Coffee Table with Hidden Storage project. Sam’s tutorial guides you through crafting a coffee table that’s not just a surface for your items but also a clever solution to keep your living area tidy. With hidden compartments, you can easily store away clutter and maintain a sleek look.
The step-by-step guide is accessible, complete with a YouTube tutorial and free printable plans from RYOBI Nation. Perfect for those who appreciate practical, space-saving furniture, this DIY endeavor promises to enhance your home decor and organizational skills. Dive into the project, and you might even get a chance to win a set of power tools to help with your future DIY adventures.
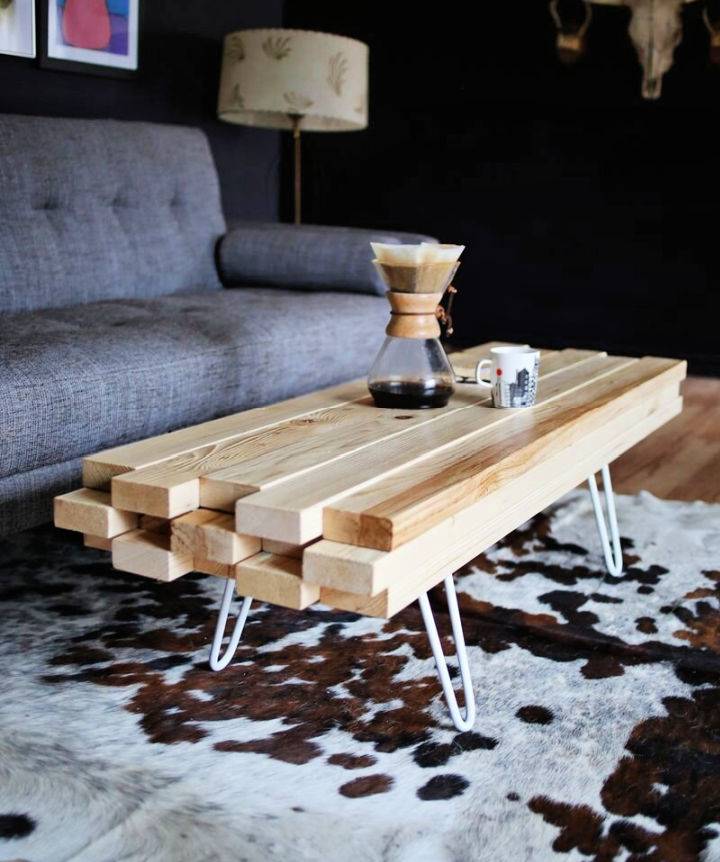
27. Live Edge Wood Coffee Table Ideas
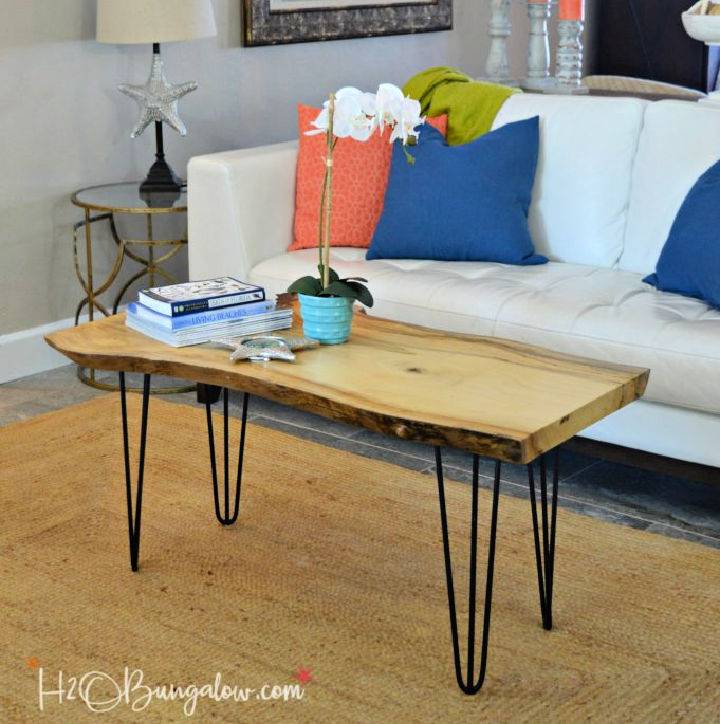
Creating a DIY live edge wood coffee table with hairpin legs is an engaging project that can transform your living space. H2OBungalow offers a detailed tutorial to guide you through the process, from selecting a wood slab to achieving a flawless finish. Ideal for those who love modern, mid-century design, this project is not only straightforward but also rewarding, as you end up with a unique piece of furniture.
With simple tools and materials, such as hairpin legs, a table saw, and a random orbital sander, you’ll be on your way to crafting a stunning coffee table that’s sure to be a conversation starter. Follow the steps carefully, and you’ll have a beautiful, handcrafted centerpiece for your home in no time.
28. How to Make a Travertine Coffee Table
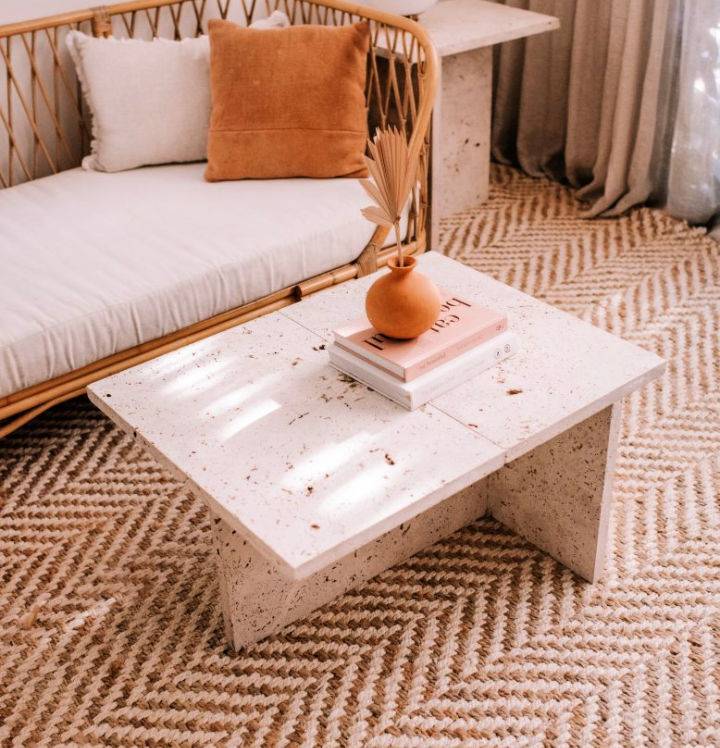
Create your own travertine coffee table with ease following the guide from Collective Gen. This DIY project transforms simple materials into a chic piece of furniture that adds a touch of elegance to any living space. With just four travertine pavers and Selley’s Hold Up glue, you can assemble a stunning coffee table without breaking the bank or needing an extensive list of supplies.
The process is straightforward, involving careful measurement and glue application, but remember to handle the heavy pavers with caution and allow the glue to set for 48 hours before moving your new table. For detailed instructions and safety tips, visit Collective Gen’s full tutorial and get ready to enhance your home with this stylish and budget-friendly creation.
29. Balustrade Coffee Table With Lower Shelf
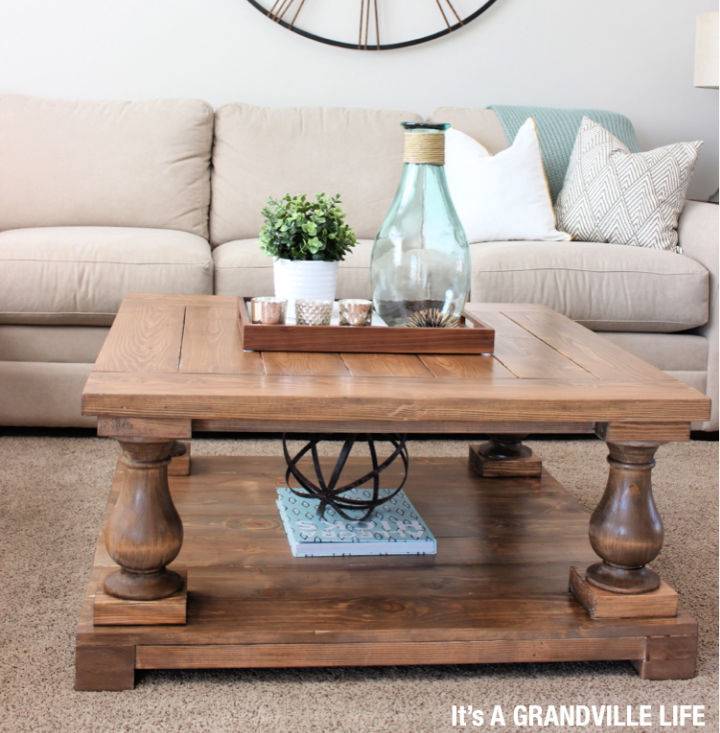
Embarking on a DIY project can be a fulfilling experience, and crafting your own balustrade coffee table is no exception. It’s A Grandville Life shares an inspiring step-by-step guide for building a table reminiscent of the stylish Restoration Hardware piece but at a fraction of the cost. With a detailed buying list, cut list, and the tools required, this project is accessible for DIY enthusiasts ready to create a stunning centerpiece for their living space.
By following this comprehensive tutorial, complete with practical tips on sanding and staining, you can achieve a high-end look while honing your woodworking skills. Dive into this engaging project and transform your family room with a handmade touch that’s both beautiful and budget-friendly.
30. Wooden Coffee Table With Metal Hairpin Legs
Creating a DIY wooden coffee table can be a satisfying project, and A Beautiful Mess offers a straightforward guide to help you build a sturdy and stylish centerpiece for your living room. Emma Chapman shares her experience crafting a new coffee table with a raw wood aesthetic, perfect for complementing various interior designs.
Her instructions are clear and concise, making the process accessible even if you’re not overly handy. The guide details the materials and tools you’ll need, along with step-by-step instructions for cutting, assembling, and finishing the table. With this helpful tutorial, you can enhance your space with a custom piece that’s both functional and appealing.
Woodworking Projects: There are plenty of free woodworking projects available online. You can find plans for just about anything you can imagine, from simple birdhouses to advance pieces of DIY furniture. The great thing about these woodworking projects is that all are designed for beginners, so even if you’re new to woodworking, you should be able to handle them with ease.
Take a roundup to learn DIY home decor much more…
DIY Shelves: Here are some easy and cost-friendly ways to build DIY shelves. For more inspiration, check out our ultimate guide on diy wall shelves with easy instructions.
How to decorate a coffee table?
Once you have your coffee table built, it’s time to start thinking about how to decorate it. After all, a coffee table is more than just a place to put your coffee cup. It’s also a fantastic way to show off your style and personality. Here are some tips on how to decorate a coffee table:
- Choose a theme: Whether you’re going for a rustic, shabby chic look or something more modern, choosing a theme will let you narrow down your decorating options.
- Add some greenery: A few potted plants or a vase of fresh flowers can really brighten up a coffee table.
- Create a focal point: Use a tray or placemat to create a designated space for your coffee cup and other items. This will help keep your coffee table looking tidy and stylish.
- Accessorize: Don’t be afraid to add a few personal touches to your coffee table. A few family photos or pretty knick-knacks can really make a coffee table feel like your own.
With these coffee table decorating tips in mind, you’re sure to make a stylish and functional coffee table. All these tips will help you style a round coffee table too.
Best coffee table books for decorating your home
If you’re looking for some great coffee table books to help decorate your home, we’ve got you covered. See our ultimate picks for the best coffee table books to help give your home a chic, stylish look.
- The Life and Style of Marilyn Monroeby Norman Jean Roy
- Coco Chanel: The Illustrated Fashion Dictionaryby Caroline Bongrand
- Fashion History from the 18th to the 20th Centuryby Farid Chenoune
- The Fashion Bookby Phaidon Press
And Here are a few magazines for your coffee table to inspire your guest.
- Vogue
- Harper’s Bazaar
- Elle
- InStyle
- Vanity Fair
- Glamour
- Lucky
- Cosmopolitan
How tall should a coffee table be?
Deciding a coffee table height is really up to you and depends on a few things like: the height of your sofa, how you want to use your coffee table, and the overall style of your living room. But a useful rule of thumb is that a coffee table should be about the same height as the seat cushions on your sofa. For example, if your sofa has 20seat cushions, then your coffee table should be about 20tall.
Another point to keep in mind is that coffee tables come in all shapes and sizes. So if you have a small living room, you might want to consider getting a smaller coffee table. Or if you have a large living room, you might want to get a larger coffee table. Just make sure that the coffee table you choose is the right size for your living room.
Coffee table height to couch
Coffee table height to couch should be around 16 inches tall so that people can easily put their feet on the ground. The coffee table should also be at least 42 inches wide so that it can accommodate a laptop, books, and other materials.
What to put on a coffee table?
One of the most important things to consider when choosing a coffee table is what to put on it. After all, it’s not just a piece of furniture it’s a focal point for your living room or family room. So take little time to think about what you want to put on your coffee table. Do you want to use it as a place to display family photos? Or maybe you want to use it as a catch-all for magazines, books, and other things you need to keep handy. Whatever you decide, just make sure it reflects your personal style.
How to paint a coffee table?
One easy way to add a pop of color to your living room is to paint your coffee table. We recommend using a high-quality paintbrush and primer to prep your table before painting. Once you’ve prepped your table, choose a paint color that complements your existing decor. Follow the given step to get started:
- Apply a thin layer of paint evenly across the surface of your coffee table.
- Once the first layer is dry, apply a second layer of paint.
- Allow the paint to dry fully before adding any decorations or using the table.
- And that’s it! Your new coffee table is now ready to enjoy.
How to stain a coffee table?
There are a few different ways you can stain a coffee table diy style. You can use a brush, sponge, or even a rag. The most important thing is to make sure that you’re using a stain that is compatible with the type of wood you’re working with. If you’re not sure, it’s always best to ask a professional.
Once you’ve chosen your stain, the next step is to apply it to the table. Be sure to mind the instructions on the can or bottle. Generally, you’ll want to apply a liberal amount of stain to the table and then wipe it off with a clean cloth. Make sure you don’t leave any streaks or smears behind.
After the stain has been applied, you’ll need to let it dry. This can take anywhere from a few hours to a few days, depending on the type of stain you used. Once it’s dry, you can apply a sealer to the table if you’d like. This will help protect the stain and keep it from fading over time.
And that’s it! You now know how to stain a coffee table diy style. With a little patience and elbow grease, you can have a beautiful coffee table that will last for years to come.
How far should coffee table be from couch?
One common question we get is, how far should my coffee table be from the couch? The Distance between the sofa and coffee table really depends on your space and how you want to use it. If you have a small living room, you might want to keep your coffee table close to the couch so that it’s easy to reach.
Alternatively, if you have a large living room, you might want to keep your coffee table further away from the couch so that you can create a separate seating area. Ultimately, it’s up to you! Just make sure that your coffee table is at a comfortable distance from the couch.
How to refinish a coffee table?
If you’re looking to refinish a coffee table, there are a few things you’ll need to do in order to get started.
- First, sand down the surface of the table using medium-grit sandpaper. Once the surface is smooth, wipe it down with a damp cloth to remove any dust.
- Next, apply a stain or paint to the table, depending on your preference.
- Finally, seal the table with a clear coat of polyurethane to protect it from wear and tear.
With these simple steps, you’ll have a beautiful refinished coffee table in no time!
What size coffee table should you build?
How big should the coffee table be? That really depends on the space you have in your living room. If you have a smaller space, you might want to build a coffee table that’s narrower and taller. However, if you have a larger space, you could build a coffee table that’s wider and lower to the ground. Just use your best decision and make sure to measure the space before you start building!
What shape coffee table for sectional?
Another thing to consider is what shape coffee table you want. The most common shapes are rectangular, square, and round. But feel free to get creative and build a coffee table in any shape that you think will look good in your space.
Now let’s talk about materials.
The most common material for coffee tables is wood. But you could also build a coffee table out of metal, glass, or even plastic. Just use whatever material you think will look best in your space that fits your budget.
Where to buy a coffee table if you’re not a DIYer?
There are plenty of places to buy coffee tables. You can find them at your local furniture store or order them online. If you’re not a DIYer, we recommend ordering your coffee table from a reputable online retailer. That way, you can get a high-quality table that will last for years.
When shopping for a coffee table, keep in mind the overall style of your home. If you have a modern home, you may want a coffee table with clean lines and a simple design. If your home has a rustic or traditional feel, you may want to look for a table with more detailed carvings or a richer finish.
No matter what style you’re going for, we’re confident that you’ll be able to find the perfect coffee table for your home. Happy shopping!
How to paint a coffee table to look vintage
One of the easiest ways to add a vintage touch to your coffee table is with paint. You can use any color you like, but we recommend a light or pastel shade. Once you’ve chosen your color, simply apply a few coats of paint to the table. You can distress the table by sanding down some of the paint if you want. This will give it a more rustic look.
Another way to add a vintage touch to your coffee table is with hardware. You can find all sorts of old doorknobs, drawer pulls, and other hardware at antique stores or online. Simply screw the hardware into the table, and you’re done!
So there you have it, two easy ways to add a vintage touch to your coffee table. With just a little bit of paint or hardware, you can transform your table into a beautiful piece of furniture.
Standard coffee table dimensions:
Standard coffee table dimensions are typically 18-24 inches tall, 30-48 inches wide, and 16-24 inches deep. But don’t be afraid to personalize your coffee table dimensions to fit your space and needs.
Building a coffee table is a relatively simple woodworking project that requires only basic tools and materials. And if you use some inexpensive wood, you can build a beautiful coffee table for less than $100.
What size coffee table for the 84-inch sofa?
When it comes to coffee tables, size definitely matters. You don’t want your coffee table to be too small or too large for your sofa. So how do you know what size coffee table to get for your 84-inch sofa?
Here’s a quick guide:
- If your sofa is 84 inches wide, you’ll want a coffee table at least 42 inches wide.
- If your sofa is less than 84 inches wide, you can get away with a smaller coffee table. Just make sure it’s big enough to hold your coffee cups and TV remote!
- If your sofa is more than 84 inches wide, you’ll want a coffee table at least 50 inches wide. This will give you plenty of room to set down your coffee cups and TV remote and any books or magazines you might want to read.
Now that you know what size coffee table to get for your 84-inch sofa, it’s time to start shopping! We’ve rounded 50 free diy coffee table plans above. Just pick the one that’s right for you and get started!
Conclusion:
If you’re here for a new project, why not try building your own coffee table? These free diy coffee table plans will show you how to create a beautiful and functional piece of furniture that will last for years. With just a few simple tools, basic skills and materials, you can have a stylish and sturdy coffee table in no time. So get started today and add some extra seating to your living room!
Note: The downloadable PDF coffee table plan includes detailed instructions and measurements.
Related DIY Ideas to Try:
 30 Cheap DIY Headboard Ideas and Plans (How to Make)
 30 DIY Outdoor Furniture Plans and Ideas for 2022 (Updated)
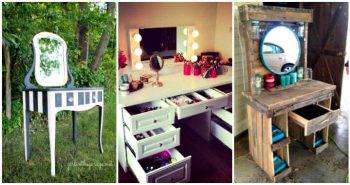 55 Free DIY Vanity Table Plans | DIY Makeup Vanity Ideas 2022
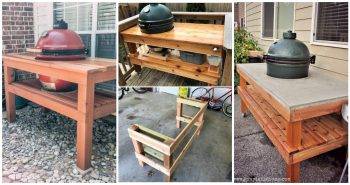 15 Free DIY Big Green Egg Table Plans (Step by Step)
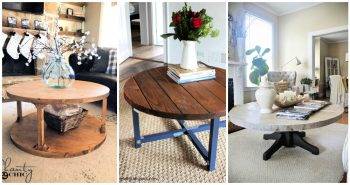 15 DIY Round Coffee Table Plans and Ideas (How to Build)
 13 Free Ana White Coffee Table Plans
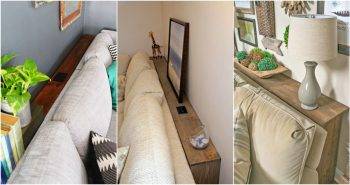 25 Free DIY Sofa Table Plans or Behind the Couch Table
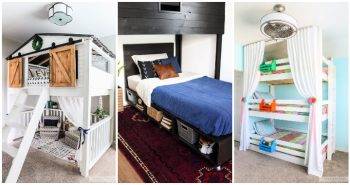 20 DIY Toddler Bed Plans Free (Build DIY Kids Bed)
 30 Easy DIY Wreath Ideas for 2024 | How To Make A Wreath
 25 Best Mason Jar Centerpieces Ideas and Designs for 2022
 60 Cheap Covered Patio Ideas to Enhance Your Outdoor
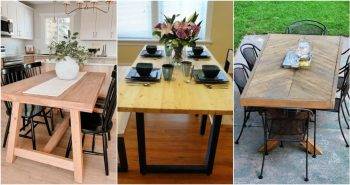 40 Free DIY Dining Table Plans You Can Build